Cricut Craft Room Tour: Easy Organization Ideas
Step inside this Cricut craft room and prepare to be inspired! If your creative space feels more like a chaotic collection of supplies than a haven for imagination, you’re not alone. We’ve all been there, digging through piles of vinyl and paper to find that one essential tool. But imagine a space where everything has its place, a beautiful and functional sanctuary that sparks joy every time you enter. This transformation is totally achievable! In this article, I’ll walk you through how we created this dream craft room on a realistic budget, tackling the project in a weekend.
You’ll discover clever organization hacks, smart storage solutions, and simple design tips that will help you curate your own personalized Cricut paradise. Get ready to reclaim your creativity and turn that frustrating mess into a masterpiece!
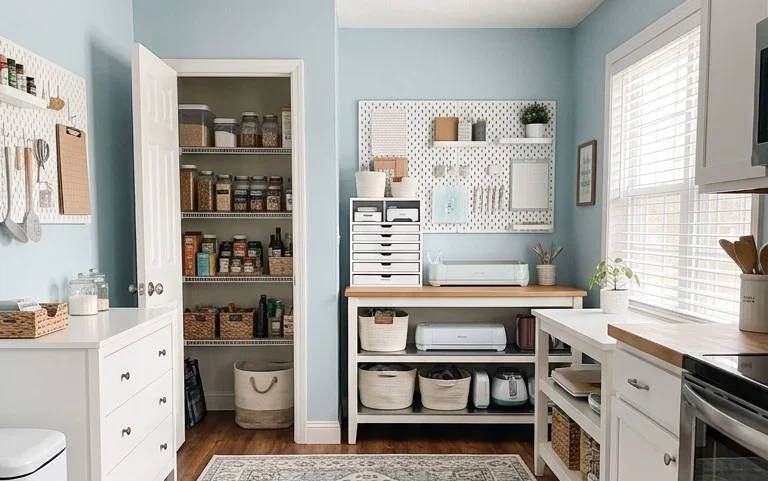
Step Inside My Cricut Craft Room: A Dreamy, Organized Oasis!
For years, my creative passion – powered by my trusty Cricut machine – was a scattered mess. Materials overflowed from bins, project pieces hid in plain sight (or not so plain sight!), and finding what I needed felt like a treasure hunt in a dust bunny graveyard. Sound familiar? Well, I’m thrilled to invite you into my transformed Cricut craft room, a space where inspiration flows freely and organization reigns supreme. This isn’t just a room; it’s my creative sanctuary, and I’m here to guide you through creating your own.
What You’ll Need and Roughly What It Costs
Let’s get down to the nitty-gritty. Creating a dedicated Cricut craft room can feel daunting, but it’s achievable. Here’s a breakdown of what I invested in, with approximate costs (prices can vary wildly based on sales, brands, and location).
* **The Star of the Show: Your Cricut Machine.** This is the big one. If you don’t have one yet, a Cricut Explore Air 3 or Cricut Maker 3 typically ranges from $300-$450.
* **Dedicated Workspace:** A sturdy desk or table is essential. I opted for a simple but robust desk from IKEA (like the MICKE or LAGKAPTEN series), which can cost between $100-$250.
* **Storage Solutions:** This is where the magic happens for organization.
* **Shelving Units:** Tall, adjustable shelving units like IKEA’s KALLAX (starting around $70 per unit) are fantastic for holding bins and displaying supplies. I have two large ones.
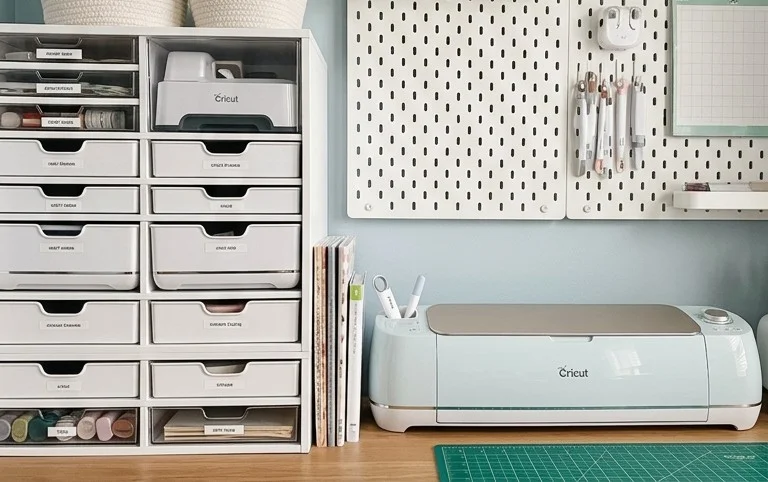
* **Storage Bins & Containers:** For vinyl, cardstock, tools, and smaller items. Clear, stackable bins are your best friend. Think variety packs from places like Target or Amazon, budgeting around $100-$200 for a good assortment. I particularly love the small drawer units (like the ALEX drawers from IKEA, around $70 each) for tiny bits and bobs.
* **Pegboard System:** A game-changer for wall organization. A standard pegboard panel is usually $20-$40, and the hooks, shelves, and containers can add another $50-$100.
* **Lighting:** Good lighting prevents eye strain and makes colours pop. A desk lamp (around $30-$50) and perhaps some task lighting (LED strip lights, $20-$40) will make a huge difference.
* **Comfort:** A comfortable chair is non-negotiable! A good ergonomic office chair can range from $150-$300.
* **Accessories:** Cutting mats, weeding tools, scrapbooking paper organizers, a small trash can – these add up but are crucial. Budget another $50-$100 for these.
**Total Estimated Cost:** For a comprehensive setup, you’re looking at roughly $800 – $1500, depending on how much you already own and your brand preferences. Remember, you can build this over time!
Measuring and Planning Before You Start
Before you buy a single bin, grab your tape measure and a notepad. This step is CRUCIAL.
1. **Measure Your Space:** Note the length, width, and height of the room or designated craft area. Don’t forget to measure windows, doors, and any existing furniture you plan to keep.
2. **Assess Your Needs:** What Cricut materials do you use most? How much vinyl do you have? What about cardstock, tools, and finished projects? This dictates the type and quantity of storage you’ll need.
3. **Sketch It Out:** Draw a rough floor plan. Where will your Cricut machine and desk go? Where do you envision your main storage units? Consider workflow. You want your machine, cutting mats, and primary tools to be easily accessible. Think about a “hot zone” around your workspace.
4. **Consider Natural Light:** Position your desk to take advantage of natural light if possible, but also think about glare on your screen.
5. **Think About Power Outlets:** Where are they located? You’ll need to plug in your Cricut, computer, and lamps.
Your Step-by-Step Craft Room Transformation
Now for the fun part! Here’s how I tackled my craft room:
1. **Clear the Clutter:** This is cathartic. Empty the entire space. Sort items into piles: Keep, Donate/Sell, Trash. Be ruthless!
2. **Clean and Prep:** Give the room a good clean. If you’re painting, now’s the time.
3. **Position Your Desk:** Place your desk in your chosen spot, ensuring good light and proximity to power outlets.
4. **Assemble and Place Shelving Units:** Position your KALLAX or similar shelving units against the walls. These are often the backbone of the organization.
5. **Install Pegboard (If Applicable):** Mount your pegboard on an empty wall. This is incredibly versatile for hanging tools, small bins, and frequently used items.
6. **Strategize Storage Bins:**
* **Vinyl:** I use tall, narrow bins or dedicated vinyl racks. Roll the vinyl upright whenever possible to prevent creasing.
* **Cardstock:** Store cardstock upright in magazine holders or dedicated cardstock drawers.
* **Tools:** Small drawer units are perfect for weeding tools, pens, blades, and small accessories. Label everything!
* **WIPs (Works in Progress):** Use larger bins with lids to keep ongoing projects contained and dust-free.
7. **Set Up Your Workspace:** Arrange your computer, Cricut mat storage, and essential tools within easy reach of your desk. I have a dedicated space for my cutting mats right next to my machine.
8. **Install Lighting:** Position your desk lamp and any task lighting for optimal illumination.
9. **Add Finishing Touches:** Incorporate any decorative elements, comfortable seating, and waste bins.
Adapting for Small Spaces or Rentals
Don’t have a whole room? No problem!
* **Small Space:** Utilize vertical space aggressively. Tall, narrow shelving units are your best friend. Wall-mounted shelves are excellent. Consider a folding desk that can be put away when not in use. A corner unit can maximize awkward spaces.
* **Rental (No Drilling!):** This is where creativity shines!
* **Adhesive Shelving:** Invest in heavy-duty command strips or adhesive shelves specifically designed for weight. Always test them first!
* **Freestanding Units:** Opt for furniture that doesn’t require wall mounting, like bookcases and multi-tier trolleys (often called “bar carts” or “craft carts”).
* **Over-the-Door Organizers:** These can be surprisingly useful for storing smaller items.
* **Pegboard Alternatives:** Look for freestanding pegboard displays or magnetic strips mounted with strong adhesive to hold metal tool holders.
Styling Notes: Colour, Texture, and Placement
A beautiful craft room is inspiring!
* **Colour Palette:** I chose a calming palette of soft blues and greys with pops of mint green. This creates a serene environment that doesn’t compete with the vibrant colours of my craft supplies.
* **Texture:** I love the mix of smooth laminate on my desk and shelves, the woven texture of some of my storage bins, and the softness of my rug. It adds visual interest.
* **What Goes Where:**
* **Desk:** Cricut machine, computer, immediate tools (weeder, scraper), notepad, and a small plant.
* **Shelving Units:** Vinyl rolls and sheets on the lower shelves (heavier items), cardstock in upright holders on middle shelves, smaller bins for beads, glitter, etc., on higher shelves. Display finished projects or inspirational items on open shelves.
* **Pegboard:** Frequently used tools (pens, scissors, rulers), small containers for beads or embellishments, a charging station for devices.
* **Near the Entrance:** A small bin for outgoing mail or returns, perhaps a mirror.
### Keeping It Tidy After Week One
The initial tidy is exhilarating, but the real test is maintaining it.
* **The “One In, One Out” Rule:** When you buy new supplies, try to use up or discard something similar.
* **Daily Tidy-Up (5 Minutes):** Before you finish your creative session, spend five minutes putting tools back, discarding scraps, and wiping down your workspace. It prevents the small messes from becoming big ones.
* **Weekly “Restock & Refile” (15 Minutes):** Dedicate 15 minutes each week to put away any stray items, replenish supplies that are running low, and ensure everything is in its designated spot.
* **Regular Decluttering:** Every few months, do a deeper dive and declutter any supplies you haven’t used and likely won’t.
### Mistakes That Make This Fail
Even in my dream craft room, there are pitfalls to avoid:
* **Overbuying Storage:** It’s tempting to buy all the bins at once, but you might end up with too much or the wrong type. Start with essentials and add as you go.
* **Ignoring Workflow:** If your most-used tools are in a hard-to-reach corner, you’ll be less likely to use them, and organization will suffer.
* **Not Labeling:** This is a HUGE one. If you can’t see what’s in a bin, you might buy duplicates or forget you have something. Label EVERYTHING!
* **Letting Scraps Pile Up:** Small scraps of vinyl or paper can quickly become a mountain. Have a designated scrap bin and empty it regularly.
* **Procrastinating the Tidy:** The longer you leave it, the more overwhelming it becomes. Those five-minute daily tidies are your best defence against chaos.
Creating a dedicated Cricut craft room is an investment in your creativity and sanity. With a little planning, the right storage solutions, and a commitment to a daily tidy, you can transform any space into your own organized, inspiring haven. Now go forth and craft!
Conclusion
Stepping into a thoughtfully organized and inspiring Cricut craft room truly transforms your creative process. The difference it makes to your day-to-day crafting is immense – no more searching for supplies, no more clutter hindering your flow. You can simply dive into your projects with ease and joy!
Ready to start your own transformation? Your smallest possible first step today could be as simple as decluttering one small drawer or shelf. Even a tiny bit of organization can bring immediate peace.
Don’t have a dedicated craft space or a Cricut? No problem! The principles of home decor and organization can be applied anywhere. Consider a “craft corner” in your living room with a stylish storage ottoman, or a simple pegboard system for your kitchen utensils to maximize space and functionality.
We hope this tour has inspired you to create your own haven of creativity and order. Keep exploring for more ideas to make your home beautiful and functional!
